What is FluxSim?
This page is a conceptual overview. If you just want to get something running, head straight to the Quickstart → article.
FluxSim is a simulation platform purpose-built for physiological closed-loop controller design. PCLC work naturally dichotomizes into two categories:
- Improving the in-silico capabilities of the simulator
- Using the simulator to develop a safe and effective controller
FluxSim supports both by providing a low-friction toggle between two design suites: Simulator Builder and Controller Iteration.
These suites target two types of engineers:
- Modeling engineers — building and validating physiological simulators, virtual patient cohorts, and PK/PD models.
- Control engineers — designing, testing, and benchmarking closed-loop controllers against those simulators.
The FluxSim workflow
The platform facilitates a four-step design process:
- Deploying a simulator — either select a pre-validated simulator from the FluxSim Simulator Library, or build your own from scratch using the Simulator Builder design suite.
- Creating or selecting a controller — generate a controller stub that matches your simulator's interface, or choose a pre-benchmarked controller from the FluxSim Controller Library.
- Running a simulation — click Simulate in the in-browser IDE.
- Evaluating results — simulation results appear automatically in the IDE, with visualizations and metrics to inform your next design iteration.
Simplified, this becomes a loop you run indefinitely:
FluxSim tracks your full version history throughout, so all of your work is traceable when it comes time for validation and documentation.
How to get started
How to deploy a simulator
After creating an account and logging in to app.fluxsim.io, you will be presented with a modal to select your starting point: either a pre-validated simulator from the FluxSim Simulator Library, or a blank canvas to build from scratch. The simulator is deployed automatically on selection. As you iterate on your design, click Deploy to push your latest changes.
How to create a controller
Once your simulator is deployed, select your controller starting point: either a pre-benchmarked one from the FluxSim Controller Library, or a generated stub that matches your simulator's interface. The stub gives you a valid starting point with the correct inputs and outputs already wired up.
How to run a simulation
With a controller open in the IDE and a deployed simulator confirmed in the top status bar, click Simulate to run your current controller against the deployed simulator across the full virtual patient cohort.
How to interpret the results
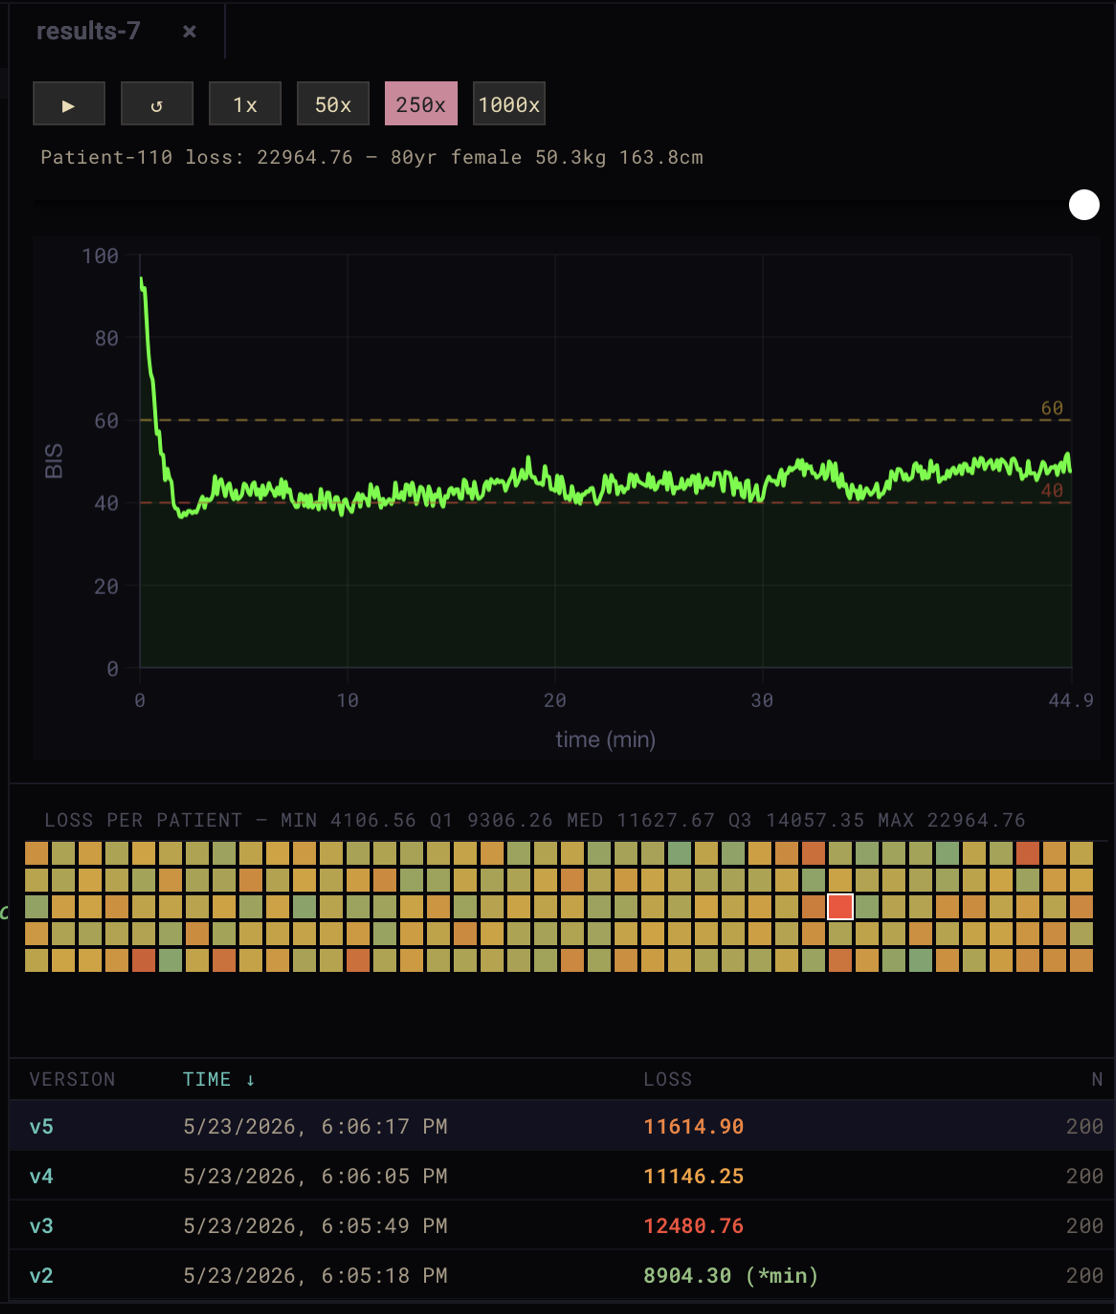
Results are automatically displayed in the right pane of the IDE. There are three sections:
- Run history (bottom) — a table of prior simulation runs showing which controller was used, when it ran, and the aggregate cohort loss. Sortable by time or loss.
- Patient heatmap (middle) — a grid showing per-patient loss, with the worst patients in red and the best in green. Defaults to the most recent run; click any historical run to compare.
- Patient trace (top) — the signal the controller uses to make decisions. Defaults to patient 0 of the most recent run. Click any cell in the heatmap to view that patient's trace.
The heatmap lets you instantly spot your worst-case patient and load their trace with a single click. The bottom table allows you to quickly revert back to your best controller design. There are no ad hoc scripts to write, because evaluation is built into the workflow, so your chain-of-thought stays in your brain's working memory and your flow state remains intact.
What's coming
Future versions of FluxSim will include a controller optimization mode. You will be able to specify a set of parameters to sweep and let the platform find the best-performing configuration, either via the Optimize button in the IDE or through an API call with a JSON-formatted parameter list. The AXON API will also let you trigger cloud simulations directly from your local IDE or LLM-assisted build environment.
For questions, support, or you just want to connect, email anthony@fluxsim.io or join the FluxSim Discord. Happy devving! I hope this tool helps improve the lives of patients undergoing surgery and those living with diabetes who are just trying to live normally.